Animated Loading Screen with MoviePlayer and Slate in UE5

Software engineer interested in game development, computer graphics, C++ and technical art.
Most solutions I found for making a loading screen in Unreal Engine rely on converting your whole project to use level streaming, setting up an UMG widget with a delay or similar ways which, depending on your project, can take a lot of time to set up and is not always reliable.
While making my own game Toontanks: Circuit Clash I discovered a different way to make a loading screen, which relies on the MoviePlayer. It is supported by all platforms and doesn't require a lot to set up. It runs on a background thread and can be bound with pre-loading and post-loading map events. It also supports playing videos, audio, UMG and Slate.
Setting up MoviePlayer
This will require a custom C++ game instance class, which runs throughout the whole game and is one of the first objects to be initialised. I will use it as a base class for my game instance blueprint class, from which I will be passing my UMG widget.
To use the MoviePlayer we need to include the MoviePlayer module in the build file. The UMG module will also be needed to create the widget later on.
PublicDependencyModuleNames.AddRange(new[]
    {
        "Core", "CoreUObject", "Engine", "InputCore", "EnhancedInput", "MoviePlayer", "UMG"
    });
The Loading Screen with MoviePlayer
To create a UMG widget in C++, we need to have a hold of the class of the widget. So we define a TSubclassOf<UUserWidget> property which will be provided via blueprints.
Then, define BeginLoadingScreen and EndLoadingScreen functions like so in your game instance header file.
public:
    virtual void Init() override;

    UPROPERTY(EditAnywhere, BlueprintReadWrite, Category="Loading Screen")
    TSubclassOf<UUserWidget> LoadingWidgetClass;

    UFUNCTION()
    virtual void BeginLoadingScreen(const FString& MapName);
    UFUNCTION()
    virtual void EndLoadingScreen(UWorld* InLoadedWorld);
Bind the delegates in your Init function and don't forget to include the right header file.
FCoreUObjectDelegates holds a series of delegate bindings for the engine. PreLoadMap and PostLoadMapWithWorld are called exactly when a map begins loading and finishes, respectively.
#include "MoviePlayer.h"

void UToonTanksGameInstance::Init()
{
    Super::Init();

    FCoreUObjectDelegates::PreLoadMap.AddUObject(this, &UToonTanksGameInstance::BeginLoadingScreen);
    FCoreUObjectDelegates::PostLoadMapWithWorld.AddUObject(this, &UToonTanksGameInstance::EndLoadingScreen);
}
In your BeginLoadingScreen function, create the UUserWidget and get its underlying slate widget pointer using TakeWidget() as the MoviePlayer only accepts the native SWidget pointer.
Then, define your attributes with FLoadingScreenAttributes. It's a structure for all the attributes your loading screen will have. The explanation for each one can be found in the documentation. Assign your SWidget pointer to the WidgetLoadingScreen attribute.
And simply pass the structure into SetupLoadingScreen().
void UToonTanksGameInstance::BeginLoadingScreen(const FString& MapName)
{
  if (!IsRunningDedicatedServer())
  {
    const auto LoadingWidget = CreateWidget<UUserWidget>(this, LoadingWidgetClass, TEXT("LoadingScreen"));
    LoadingSWidgetPtr = LoadingWidget->TakeWidget();

    FLoadingScreenAttributes LoadingScreen;
    LoadingScreen.WidgetLoadingScreen = LoadingSWidgetPtr;
    LoadingScreen.bAllowInEarlyStartup = false;
    LoadingScreen.PlaybackType = MT_Normal;
    LoadingScreen.bAllowEngineTick = false;
    LoadingScreen.bWaitForManualStop = false;
    LoadingScreen.bAutoCompleteWhenLoadingCompletes = true;
    LoadingScreen.MinimumLoadingScreenDisplayTime = 1.f;

    GetMoviePlayer()->SetupLoadingScreen(LoadingScreen);
  }
}
And that's it! Now you have an UMG widget that is displayed every time a new map is being loaded.
The MoviePlayer will automatically destroy the loading screen when the map has finished loading, but you can use EndLoadingScreen for anything extra you would like to do.
And this is where we could stop, but I wanted to explore how to use this with Slate.
Why Slate?
Because MoviePlayer runs on a background thread, the UMG widgets will not tick. In my game, I circumvented this by creating my own Slate widget for the part that need to be animated, it's also a good opportunity to learn about Slate in general. And it works if I just include it as part of the UMG widget I am using for the loading screen.
What I want from my animated widget, is essentially just two brushes. One sits on top of the other and rotates at some rate. Those brushes then can be exposed to the editor to provide custom images. The result should look something like this:
Setting up Slate
This is slightly more advanced, so I would advise you to follow the source code.
This will require private modules for Slate, which are already written in the build file, all you need to do is to uncomment it.
// Uncomment if you are using Slate UI
PrivateDependencyModuleNames.AddRange(new[] { "Slate", "SlateCore" });
To make a Slate widget, two classes will be needed. A UWidget and an SCompoundWidget class. The UWidget class is essentially a wrapper for the SCompoundWidget class, and is the one that will be exposed to the editor.
SCompoundWidget
The SCompoundWidget is the base class from which all non-primitive widgets are built, and that's what we need. It holds a protected member called ChildSlot that we will use to provide the content and hierarchy of the widget.
Now, create a class, which I am naming SLoading that inherits from the SCompoundWidget class. By convention, Slate widget file names start with an S.
There are two major things to set up in this class. A Construct method, where we will construct the widget, and the overridden OnPaint function to define how it renders.
Define the rotating and the background brushes along with their setters and getters, as well as Sequence and the CurveHandle that will be used for the animation. RotationSpeed is the rate at which the brush is going to rotate.
private:
    FCurveSequence Sequence;
    FCurveHandle CurveHandle;

    const FSlateBrush* RotatingBrush;
    const FSlateBrush* BackgroundBrush;
    float RotationSpeed;
You can set up your arguments with SLATE_BEGIN_ARGS and give them initial values like so.
public:
    SLATE_BEGIN_ARGS(SLoading)
            : _RotatingBrush()
            , _BackgroundBrush()
            , _RotationSpeed(0.2f)
        {
        }

        SLATE_ARGUMENT(const FSlateBrush*, RotatingBrush)
        SLATE_ARGUMENT(const FSlateBrush*, BackgroundBrush)
        SLATE_ARGUMENT(float, RotationSpeed)
    SLATE_END_ARGS()
Construct
In the cpp file, in the Construct method, you will need to define your widget.
SNew defines a new component, in this case an overlay, which should have two slots defined with + SOverlay::Slot(). Each slot should have HAlign and VAlign properties to center it. And in each of those slots - the appropriate brush, which in this case are our images.
We also would like to assign the brushes with the initial values and set up a curve with a given start time and offset, and start playing it.
void SLoading::Construct(const FArguments& InArgs)
{
    RotatingBrush = InArgs._RotatingBrush;
    BackgroundBrush = InArgs._BackgroundBrush;
    Sequence = FCurveSequence();

    ChildSlot
    [
        SNew(SOverlay)
        + SOverlay::Slot()
          .HAlign(HAlign_Center)
          .VAlign(VAlign_Center)
        [
            SNew(SImage)
            .Image(BackgroundBrush)
        ]
        + SOverlay::Slot()
          .HAlign(HAlign_Center)
          .VAlign(VAlign_Center)
        [
            SNew(SImage)
            .Image(RotatingBrush)
        ]
    ];

    CurveHandle = Sequence.AddCurve(0.f, 60.f);
    Sequence.Play(AsShared(), true, 0.f, false);
}
OnPaint
The OnPaint function defines how the widget is rendered. Here we can set up its transform for rotation, as well as pass in colour and opacity parameters.
Let's define RotationTransform which takes our curve's linearly interpolated value between 0 and 1, which we can use to determine the angle of the rotation and multiply it by our RotationSpeed variable for the rate.
Then, create the geometry for the two brushes, using the calculated RotationTransform for the rotating brush. FVector2D(0.5, 0.5) centers the pivot from which it's going to be rotating.
const auto RotationTransform = FSlateRenderTransform(FQuat2D(CurveHandle.GetLerp() * 360.f * RotationSpeed));

const FGeometry RotatingImageGeo = AllottedGeometry.MakeChild(
        RotatingBrush->ImageSize,
        FSlateLayoutTransform(),
        RotationTransform,
        FVector2D(0.5f, 0.5f)
        );

const FGeometry BackgroundImageGeo = AllottedGeometry.MakeChild(
        BackgroundBrush->ImageSize,
        FSlateLayoutTransform(),
        FSlateRenderTransform(),
        FVector2D(0.5f, 0.5f)
        );
Now, make two boxes for each brush, passing in the geometry. The last argument is for the tint which allows it to be customised in the editor.
FSlateDrawElement::MakeBox(
        OutDrawElements,
        LayerId,
        BackgroundImageGeo.ToPaintGeometry(),
        BackgroundBrush,
        ESlateDrawEffect::None,
        InWidgetStyle.GetColorAndOpacityTint() * BackgroundBrush->GetTint(InWidgetStyle)
        );

FSlateDrawElement::MakeBox(
        OutDrawElements,
        LayerId,
        RotatingImageGeo.ToPaintGeometry(),
        RotatingBrush,
        ESlateDrawEffect::None,
        InWidgetStyle.GetColorAndOpacityTint() * RotatingBrush->GetTint(InWidgetStyle)
        );
UWidget
Now we can create the Loading class which inherits from the UWidget, in which we define the properties that will be exposed to the editor and synchronised with our SWidget.
public:
virtual void SynchronizeProperties() override;
virtual void ReleaseSlateResources(bool bReleaseChildren) override;
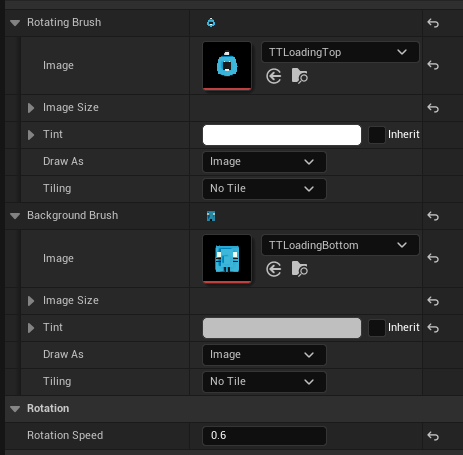
UPROPERTY(EditAnywhere, BlueprintReadWrite, Category="Appearance")
FSlateBrush RotatingBrush;
UPROPERTY(EditAnywhere, BlueprintReadWrite, Category="Appearance")
FSlateBrush BackgroundBrush;
UPROPERTY(EditAnywhere, BlueprintReadWrite, Category="Rotation")
float RotationSpeed = 0.2f;
#if WITH_EDITOR
virtual const FText GetPaletteCategory() override;
#endif
protected:
virtual TSharedRef<SWidget> RebuildWidget() override;
TSharedPtr<SLoading> LoadingSlate;
In SynchronizeProperties() use the setters to sync the properties. The function is called after construction or when the editor needs to update modified state. RebuildWidget() is called when the underlying SWidget needs to be constructed, so this is where we pass in our initial parameter values to our SLoading widget on construction.
GetPalleteCategory() allows to set up our own category in the editor palette to organise it and find our custom made Slate widgets.
void ULoading::SynchronizeProperties()
{
    Super::SynchronizeProperties();
    LoadingSlate->SetRotatingBrush(&RotatingBrush);
    LoadingSlate->SetBackgroundBrush(&BackgroundBrush);
    LoadingSlate->SetRotationSpeed(RotationSpeed);
}

void ULoading::ReleaseSlateResources(bool bReleaseChildren)
{
    LoadingSlate.Reset();
}

TSharedRef<SWidget> ULoading::RebuildWidget()
{
    LoadingSlate = SNew(SLoading)
    .RotatingBrush(&RotatingBrush)
    .BackgroundBrush(&BackgroundBrush)
    .RotationSpeed(RotationSpeed);
    return LoadingSlate.ToSharedRef();
}

#if WITH_EDITOR
const FText ULoading::GetPaletteCategory()
{
    return LOCTEXT("CustomPaletteCategory", "ToonTanks Slate");
}
#endif
Success
Now we can load up the editor and find our newly created Slate widget in the widgets palette.
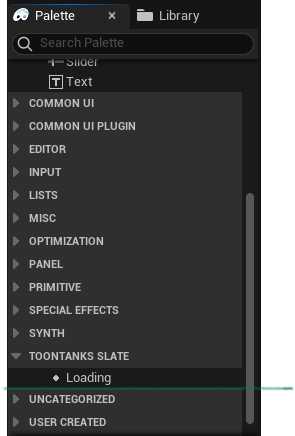
And if we drag it in, we can customise its properties.
That's it! Don't forget to pass your widget in your game instance blueprint and it should be good to go.